

How To Install A Rear Camera
Looking to do your first fill-in photographic camera installation? Y'all've come to the right place.
This guide will walk you through the steps of purchasing, planning and preparation of your vehicle, and finally, the installation itself.
Delight Annotation: This article is intended as ageneral overview and introduction to the process of fill-in camera installation. While we include specific step-by-footstep instructions with our products, be certain to follow the instructions foryour specificbackup camera model.
The procedure is straightforward if y'all're a scrap handy, read through this guide, and prepare. If y'all feel uncomfortable with the process most people can still salvage coin purchasing a kit and having someone more mechanically inclined install it, rather than taking information technology to the dealership.
Tabular array of Contents:
- The One Minute Explanation of How Backup Camera Installs Work
- Backup Camera Installation Costs
- Plan for Rear View Camera Installation Success
- Sample Wiring Diagrams
- Assemble your tools and equipment for camera installation
- Sample Installations
- Testing time
1) The One Minute Explanation of How Backup Camera Installs Work
Every backup camera installation follows roughly the same few steps:
1) Kickoff make up one's mind which blazon of backup camera you want . There are many types of backup cameras you can choose from depending on your backup camera mounting options andrearview camera system power needs. You can choose between wifi models, or hard wired models (more reliable) that link up to an auxiliary screen. (We embrace thepros & cons of wired vs wireless systems.
We also have a wide selection of high quality OEM replacement backup cameras that will provide an equivalent experience to your current camera. There are besides a variety of fancierDVR and integrated safe equipmenty'all could choose from while you're at it. Options with a wider characteristic set up volition of course run yous more, but could save you thousands when dealing with insurance. More chieflythey will assistance keep you and your family safe.
ii) Next order your preferred backup camera, read the instructions, & prep your work area. For OEM like fill-in photographic camera replacements you're going to want to be extra sure you have the right model.
- Broadly speaking, no matter what camera arrangement yous choose you lot'll accept to then exercise the following:
- Depending on your chosen format for viewing the video you'll need to either:
- Install your selected monitor onto your dash or preferred location within your cab.
- Remove your current rearview mirror and install the new unit you've selected.
- Remove the panels necessary to gain admission to your car's head unit so you can wire your camera appropriately or install your wifi interface module.
- Then you have to run the cables for either power, trigger wire, or video feed (depending on your configuration & monitor) to the back of the car.
- Afterwards you take to mount and install your backup camera in your called location.
- From there yous need to decide on your platonic way to power your photographic camera, by either hooking upwardly to the opposite lite power (most common just this provides the least weather condition resistance) or powering with a connection in the cab.
- Depending on your chosen format for viewing the video you'll need to either:
3) From there you should be able to test and make certain everything is working equally intended. In most cases you'll want to be sure the organization is fully installedbefore testing your install.
2) Backup Camera Installation Costs
If your camera has bitten the dust you're likely request yourself: How much is it to add together a backup camera? How much is it going to cost me to supersede a fill-in camera?
The proficient news is that with an installation similar this, any handy person will probable already accept most of the necessary tools on mitt, and we provide useful extras in our kits like ties and tools to pry parts off.
Backup camera installation toll is often entirely dependent on you! The units themselves tin range in price from:
- <$100 for a basicfill-in camera. There are always cheaper options out there, only they typically have weaker cables and less weather resistance than our products.
- $100-200 for auniversal license plate style backup camera or wifi enabled smartphone backup camera. These are standard workhorse backup cameras that will become the job done.
- Depending on your desired bells and whistles we also have a great option of high quality:
- Ford OEM Fit Fill-in Cameras
- GM OEM Fit Fill-in Cameras
- Toyota OEM Fit Fill-in Cameras
- Contrivance & Chrysler RAM OEM Fit backup Cameras
- Universal Backup Cameras
- Armada Camera Backup Cameras
- Ag Cameras
As far every bit time goes, you should upkeep between 1 to 4 hours to install your fill-in camera. Your experience and the complexity of your called system really determine how long it'll take. Obviously you don't want to blitz.
Let'south get going so you can come across how to plan the installation.
3) Program for Rear View Camera Installation Success
Mind, this isn't going to be as elementary as information technology is to backup your camera roll. You're going to need to remember about how you'll route these cables through your automobile, and get your hands dirty.
But having a skilful plan is going to become a long way.
Start, yous need to make up one's mind where you're going to want to expect to see this backup camera.
Installing a display in your dashboard or radio console is a whole unlike kettle of fish, ane of which we will accost in a afterward guide.
For the purposes of this example, we're going to assume you've caused a rear view mirror kit or 1 which you tin can mountain on top of your dashboard or to your windshield. At that place are advantages and disadvantages to both, and then we won't advocate for either here. However, we do recommend that if yous've bought a kit, use the monitor that comes with it, equally that volition make things much easier.
Adjacent, you have to inquire: Are the provided cables long enough for my car? Information technology's ameliorate to have too much and so too little, because you can always trim information technology downwards or secure actress wire. With as well petty wire, you might observe yourself out of luck right in the heart of a project. Make a crude measurement from where you're going to identify the camera dorsum to your trunk/license plate surface area. That will roughly correspond to what you need, and make sure yous have a few extra feet just in instance. All of which is to say, brand sure you lot chosen kit will actually fit in your car, truck, or SUV. While we include plenty of high quality wire in our kits, you can typically tell a low quality backup camera kit by how much idea went into the connector wires quality.
Before you get started you'll want read and reread the instructions. Installing a camera should be painless if you know what you're doing, and have familiarized yourself with the process.
And with that, you should be ready to kickoff your installation. Next, we'll move on to how to install the fill-in photographic camera.
4) Sample Wiring Diagrams
Below is an case of whatnear backup photographic camera installations look like when using monitors:

Below is an example of whatalmost backup camera installations expect like when using rearview mirror monitors:
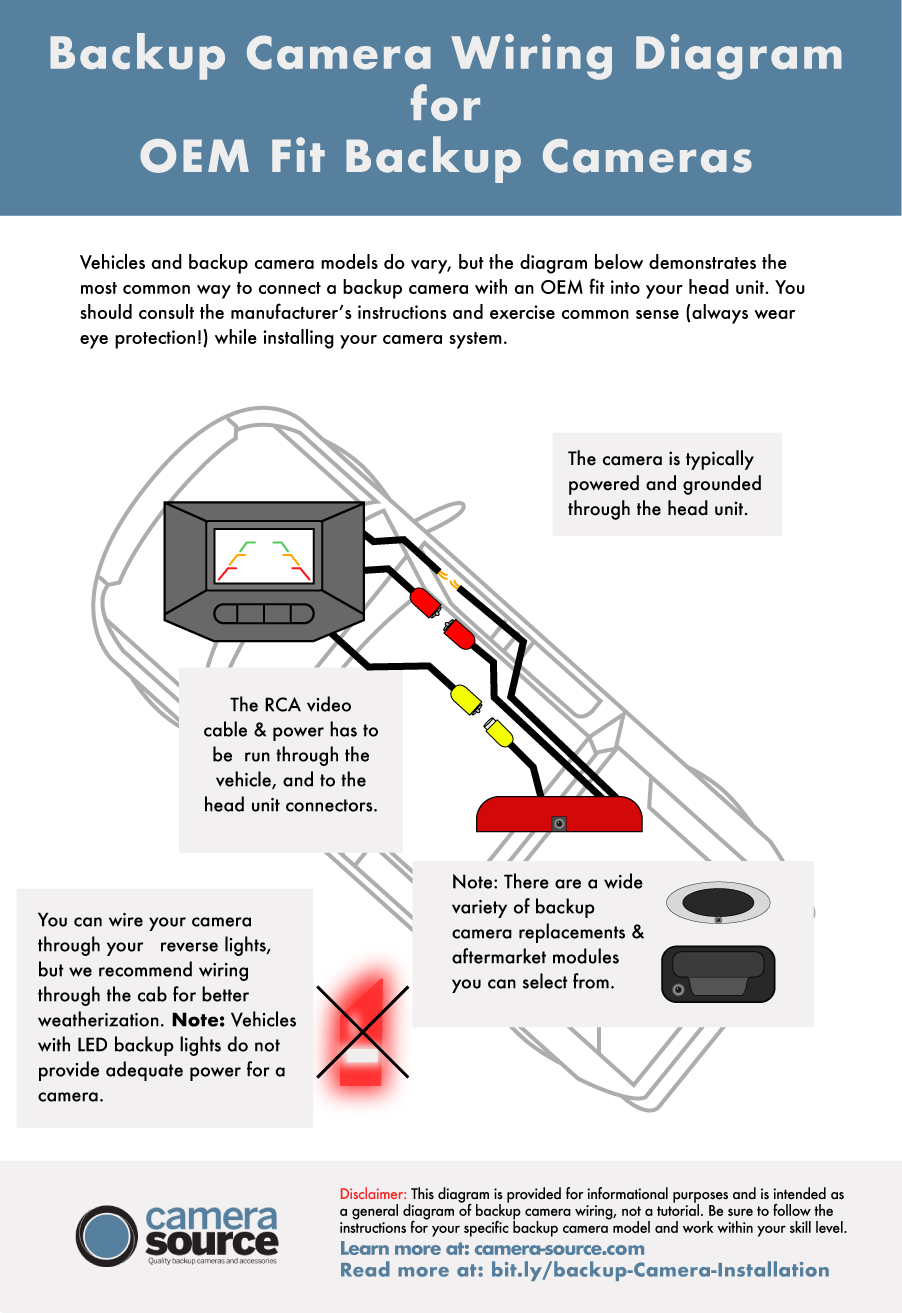
Below is an example of whatmost backup camera installations look like when using OEM fit components.
5) Get together Your Tools and Equipment for Camera Installation
For your tools, you'll need a power hand drill, an appropriate flake for drilling holes to feed cable, angling tools can be helpful, and the right size rubber grommet (a cylinder of rubber that will protect the cables from being damaged by the precipitous metal edge of the pigsty you lot're going to drill) & ties tin can proceed things secure.
Your backup photographic camera will likely come up with the necessary cables (usually camera and monitor female/male person RCA cords with connectors for video, power cables, ground wires, and potentially a trigger wire). If not, y'all'll probably demand to buy these, and most can be found at a hardware or A/V store. Finally, a crimper or wire stripper will exist useful to have on mitt.
Ever car and photographic camera kit will be a fleck different merely generally speaking y'all should be covered if you have the following tools on paw:
- Hand drill with drill bits for drilling metal (preferable high speed bits coated with titanium oxide)
- Torx ready
- Wrench Gear up
- Prophylactic Goggles
- Flashlights
- Standard wire stripper/crimper
- Torx socket set
- Razor knife
- Socket or nut runner ready
- Trim removal tool or small plastic putty knife
- Soldering iron and solder (optional)
- Compress tube (optional)
Finally, if your kit didn't come with ane, you'll need to purchase a monitor, but it helps to figure out the next pace earlier doing then.
6) Sample Installations
Nosotros'll include a general walk-through of an install here, but you lot can also cheque out some of our specific product guides for installation below.
Nosotros accept complete installation guides for our products below:


Install Case for a Backup Camera with a Monitor
Your backup camera is well-nigh likely going to be installed simply to a higher place or on your license plate. We'll start there. Hither's what to exercise:
- Remove the interior panel of your trunk. This is likely hard plastic or rubber, and you should be able to use a think tool like a flathead screwdriver to pry it off. This won't interruption annihilation, and information technology will give you a practiced expect at all the cables necessary. Virtually things tin can be finessed out, if you're snapping plastic you're getting too ambitious during the install.
- Remove your license plate.
- Making certain you're not going to cut any existing cables, drill a pigsty from the exterior side of your trunk that will exist large plenty to run the necessary cables through. You'll add your license plate back subsequently, merely it's a good idea to make sure that if yous're going to be installing the photographic camera over the plate that you won't be blocking your license plate number.
- Insert the rubber grommet you lot bought earlier. Now you're ready to showtime running and connecting wires.
Running and connecting wires
Here'south where we kickoff to effigy out how to power a backup camera. Let's go!
- Run the camera and ability cablevision through the hole into the interior of your automobile.
- Locate the reverse light wires for your car. This is a tricky step, and y'all want to make certain that you practise a good task. This is how to connect a backup camera to the contrary lite. Make sure to double check your owners manual to ensure you've located the right ane.
- Strip the positive and negative wires on your reverse lights (make sure your machine is powered off before you practice this). Using a small screwdriver, split up some of the strands of the stripped wire, and splice in the power cable for your backup camera to them. Unremarkably y'all tin practice this by looping the wires together. Make sure positive is connected to positive and negative is connected to negative. Once y'all've done this, cover everything in electrical tape.
- Connect the RCA cable to the photographic camera'southward cable, and run it all from the trunk to the fuse box expanse at the front of the motorcar. This is commonly located to the bottom left of the steering wheel. Yous can conceal the cable underneath the ceiling panels of your vehicle if you desire to pare them back, or if you don't care about aesthetics, just attach information technology to the ceiling of your car.
Mount the Monitor
- Next step is mounting your monitor. Information technology may be one that mounts to your rearview mirror, or one that mounts to your dashboard. In either upshot, post-obit the mounting instructions that come with the device is your all-time bet. If all else fails,this fill-in camera installation guidetin be very helpful.
- Connect the RCA cable to the RCA output on the monitor. Yous may also need to run a trigger wire upwards to your monitor, or even power information technology through the same source as the backup camera. (Once more models volition vary.)
- If the monitor requires it, you'll likely demand to install a fuse tap, which will let y'all to connect the bare wiring of your monitor to the power of your fuse box. Run across the guide linked to a higher place for good instructions on how to do this.
Mountain the Camera
- Get excited, because we're on the home stretch. All yous need to do at present is mount the camera itself to the back of your license plate or trunk, connect the appropriate wires (RCA and power) and yous should be set up to go!
7) Testing time
Time for the dry run. Before you reassemble everything in your car, run some different configurations of driving conditions to make sure that the camera is functioning properly. Put your auto in reverse to test and make sure that the camera is powering on when it is supposed to, and also exam your brakes to brand sure y'all didn't wire the camera into the wrong cable (you don't want it coming on every time y'all pump the brakes).
If you encounter any bug you might want to reference some of our basic support guides similar:
- Troubleshooting a backup camera that's not working
- Troubleshooting a blurry backup photographic camera
- Troubleshooting a foggy backup camera
If you're experiencing problems, double cheque the transmission and remember that near problems in environments like this come up from bad wire splices, bad connections non tying off unused ability cables.
Start there, and go on to troubleshoot until you take a performance backup photographic camera!
Getting the job done right!
Photographic camera Source is your #1 provider of backup cameras and camera solutions. If reading this guide makes you want to install a camera of your own,browse our products, or get in touch with u.s.a. for more than information.

Source: https://camerasource.com/blog/guide-to-backup-camera-installation/
Posted by: blakemanmulend.blogspot.com
0 Response to "How To Install A Rear Camera"
Post a Comment